

The following provide instructions on issuing certificates for those customers using the Sectigo portal to issue their CableLabs PKI certificates. For those customers using a different portal, please contact [email protected] for more information.
Login
When your organizations account is set-up or a new admin is added to the portal, you will receive an email from PKI Ops with your username. Note: only those designated as Admins on the organization’s account (as defined by the DCSA or a contact change request) will be given access to the portal.
Note:
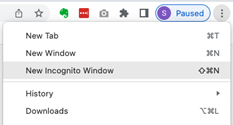
We suggest using Google Chrome in the “Incognito” mode (see image below) or similar “private” browsing modes from other browser providers. This will ensure there is not a conflict with previous cookies/cache that can sometimes cause issues in accessing your admin cert.
When you receive your username for the first time, navigate with a browser to iot.sectigo.com and click “Forgot Password” and follow the instructions for resetting your password.
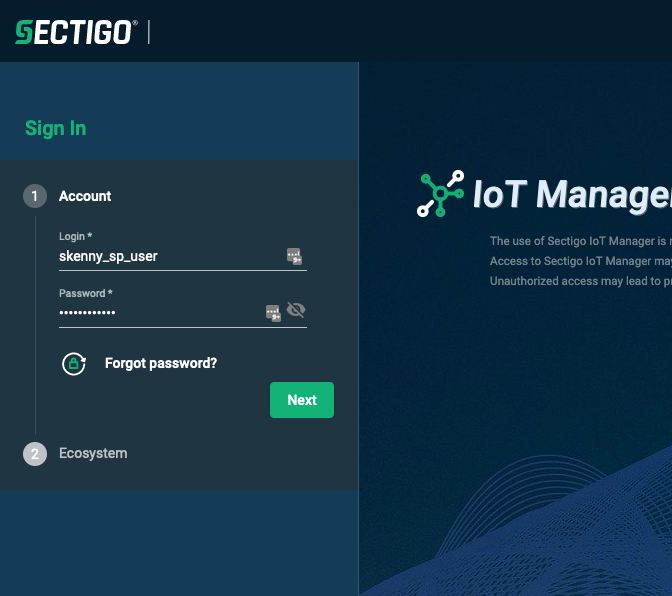
Once reset, return to the login screen and enter your username and password and click “Next”. You will be prompted for your admin certificate, which needs to be previously downloaded and installed in your computer’s certificate store. If you do not have an admin certificate, contact [email protected].
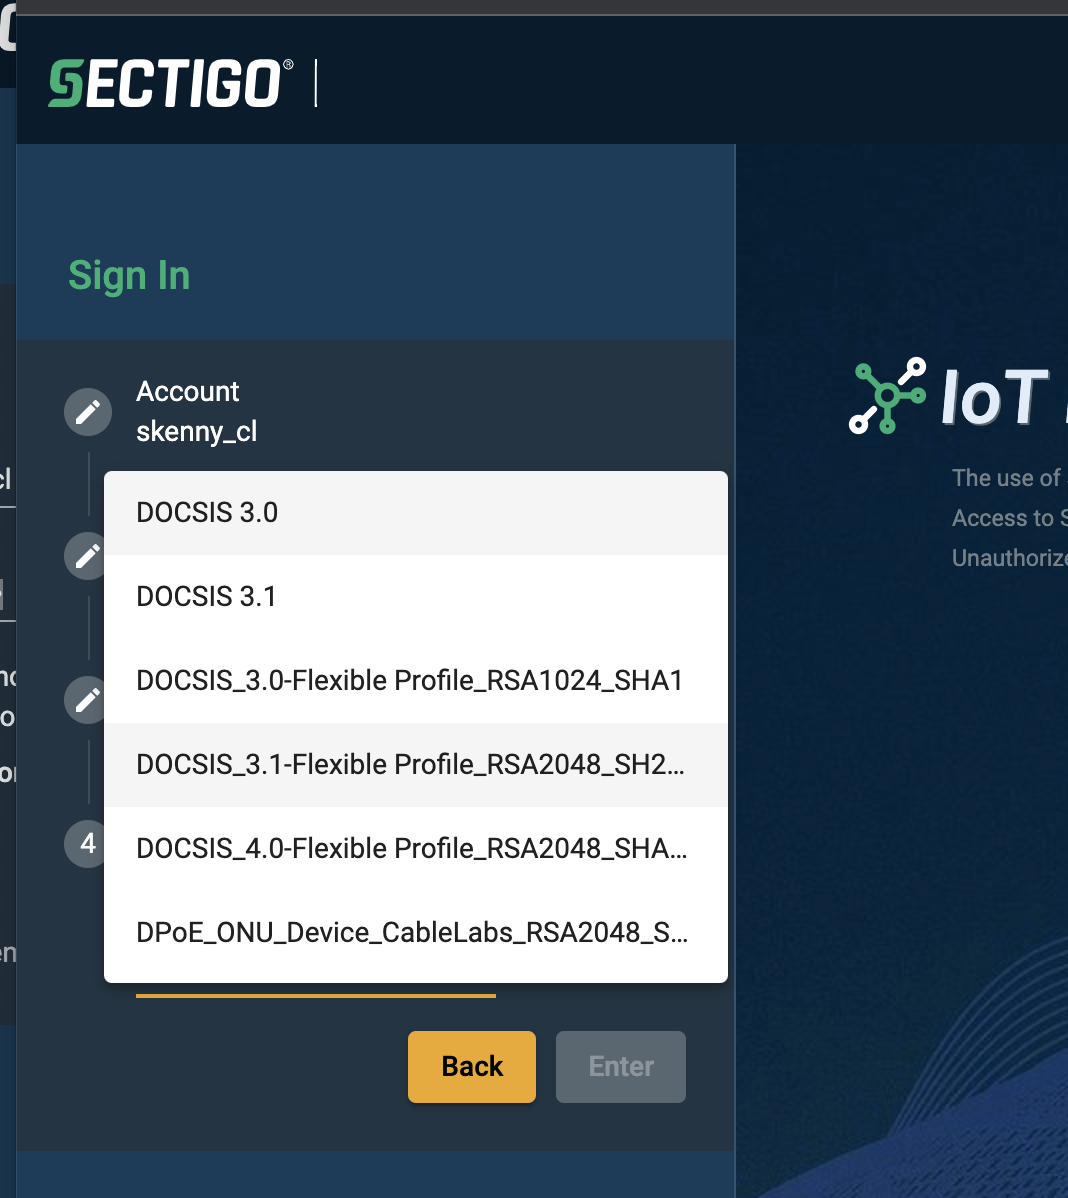
Under “Ecosystem” select the particular type of cert (e.g. D3.1, D3.0, PacketCable) you would like to request and click “Enter” (You can change to a different certificate type after you login).
General Navigation
Once logged in, you will come to the main page and have three main tabs to choose from:
Batches
In Batches, you can view previously created batches for your organization (that will include batches from you or others in your organization) as well as take action on those batches such as rejecting them, revoking them or downloading the certificates.
In the Batches tab, you can also create new orders, as described below.
Certificate Profiles
Certificate Profiles shows you which profiles for the ecosystem have been assigned to your user ID.
You can also download the intermediate and root certificates from this page, as described below.
Certificates
Certificates allows you to search and view the individual certificates previously created in the batches as well as revoking certificates.
Generating and downloading new certificates
Creating, reviewing and downloading new certificates will comprise a majority of the activities in the portal. Please see the steps below:
- Create a new cert order (New CSR Form)
- Create a new cert order (New CSR Single)
- Create a new cert order (Upload CSR)
- Create a new cert order (Upload CSV)
- Download a batch
- Reject a batch
Create a new cert order
To create a new batch of 1 or more certs, use the following steps:
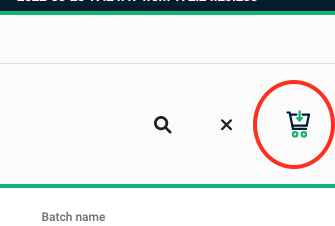
- From the Batches tab, click on the Shopping Cart icon in the top right portion of the screen.
- A new window will appear prompting you to enter the order information. You have three options to do so:
New CSR (Form)
This option allows you to manually enter the certificate details and is useful for creating a single certificate as a time. (If you have mulitple certs to create at once, use the Upload CSV option).
![]()
- Enter the Batch Name. This can be whatever you chose, but should uniquely reference the cert being created for easier reference on the main Batches page.
- Enter the Batch Size. This is the total number of certificates you want to issue.
- Enter a password for the PKCS12 file. Since this file will contain both private and public keys, it needs to be protected with a password. Do NOT lose this password otherwise you will be unable to access the certificate.
- Enter the starting MAC address to be used in the sequence.
- Select the type of generator you would like to use (e.g. MAC) and the increment value (e.g. 1, 10) you want to use for each subsequent certificate.
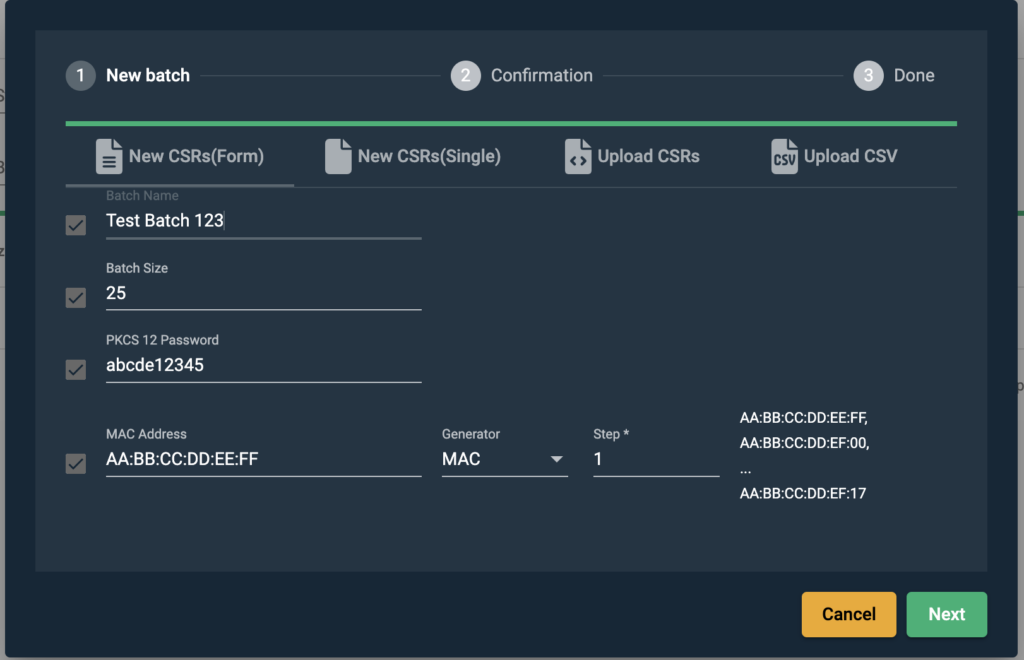
- Click Next. A new screen will appear confirm the details of the uploaded request.
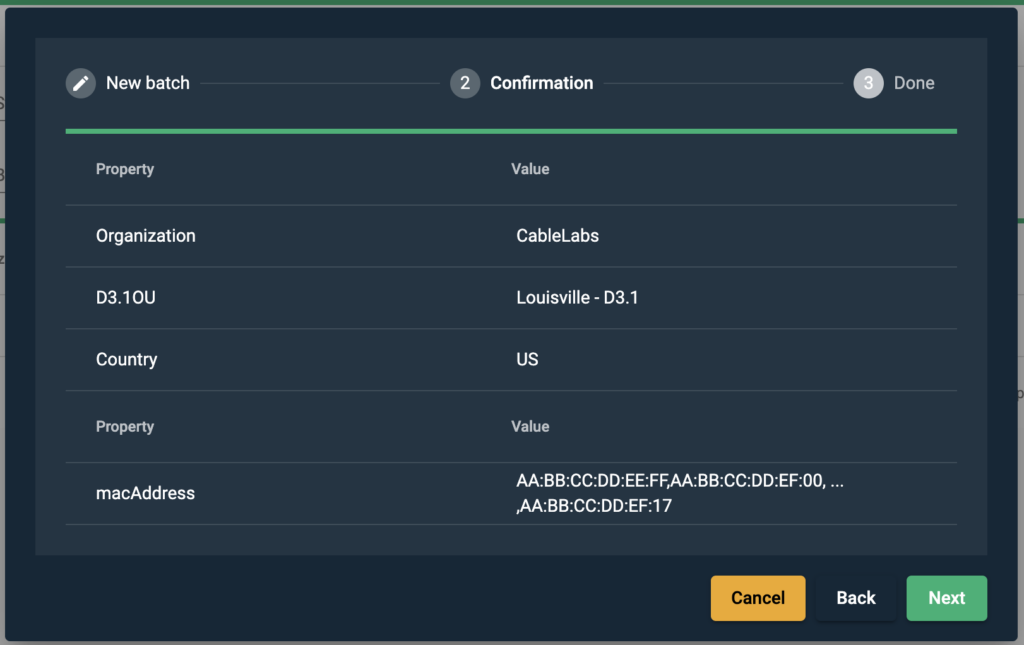
- Click Next. The request will be submitted for processing. If successful, you will see the order status as Ready for download on the Batches screen. If an error occurred, the Status will indicated there is an issue and the details can be found in the information screen for the batch.
New CSR (Single)
This option allows you to manually enter the certificate details and is useful for creating a single certificate as a time. (If you have mulitple certs to create at once, use the New CSRs (Form), Upload CSRs or Upload CSV options).
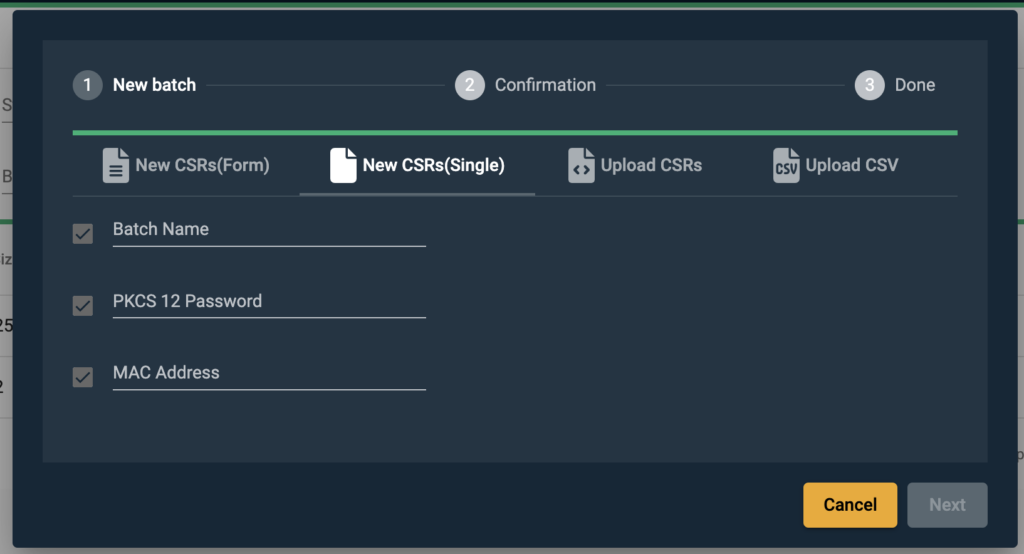
- Enter the Batch Name. This can be whatever you chose, but should uniquely reference the cert being created for easier reference on the main Batches page.
- Enter the Batch Size. This is the total number of certificates you want to issue.
- Enter a password for the PKCS12 file. Since this file will contain both private and public keys, it needs to be protected with a password. Do NOT lose this password otherwise you will be unable to access the certificate.
- Enter the MAC address to be used for the certificate.
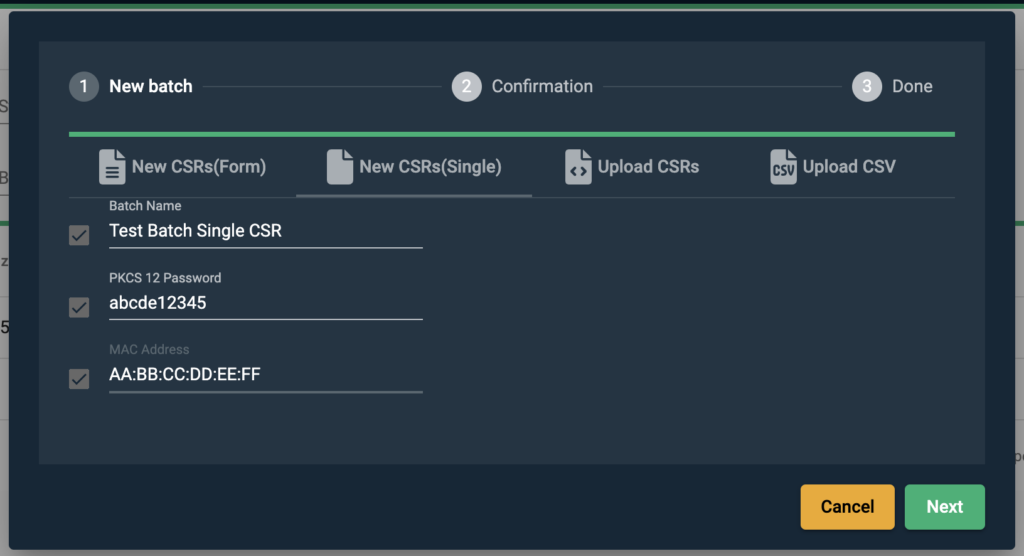
- Click Next. A new screen will appear confirm the details of the uploaded request.
- Click Next. The request will be submitted for processing. If successful, you will see the order status as Ready for download on the Batches screen. If an error occurred, the Status will indicated there is an issue and the details can be found in the information screen for the batch.
Upload CSR (Multiple)
If you choose to generate the private key on your own system, you can use the Upload CSR option.
![]()
- Click on the Upload CSR tab.
- Select the CSR file to upload from your local system.
- The batch name will be prefilled with the filename of the CSR. You can edit the batch name to whatever you chose, but should uniquely reference the cert being created for easier reference on the main Batches page.
Click Next. A new screen will appear confirm the details of the uploaded CSR.
- Click Next. The CSR will be submitted for processing. If successful, you will see the order status as Ready for download on the Batches screen. If an error occurred, the Status will indicated there is an issue and the details can be found in the information screen for the batch.
Upload CSV
If you have multiple certs to create at once, use the Upload CSV option.
- Click on the Upload CSV tab.
- Click on Choose File* and select the CSV file to upload from your local system. Note: if you need the latest CSV template to fill in with the cert information, click on the Cloud Download icon and the csv template will be downloaded to your computer.
![]()
- The batch name will be prefilled with the filename of the CSV. You can edit the batch name to whatever you chose, but should uniquely reference the cert being created for easier reference on the main Batches page.
- Enter a password for the PKCS12 file. Since this file will contain both private and public keys, it needs to be protected with a password. Do NOT lose this password otherwise you will be unable to access the certificate.
- Click Next. A new screen will appear confirm the details of the uploaded CSV.
- Click Next. The CSV will be submitted for processing. If successful, you will see the order status as Ready for download on the Batches screen. If an error occurred, the Status will indicated there is an issue and the details can be found in the information screen for the batch.
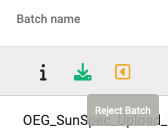
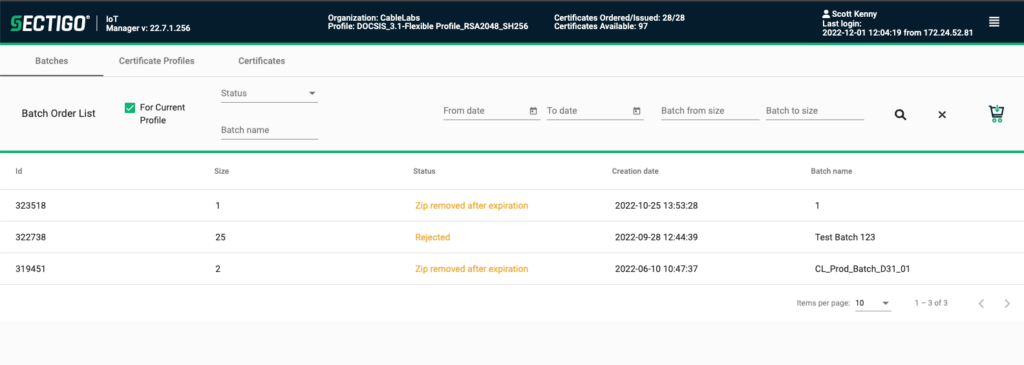
Reject a batch
If an error is found in a batch after it has been created but BEFORE it is downloaded, the batch can be rejected and the certificate quantity returned to your available certs. Once a batch has been downloaded, it is considered “Issued” and those certs can only be revoked. No credit is given for certs which have been issued (and subsequently revoked).
-
- Find the row of the batch to reject and hover your cursor over it. If it available to reject a small yellow icon with a left-facing arrow will appear
-
- Click on the yellow icon. The batch will be rejected and the updated status shown for the batch.

View and download a batch
Once a batch has been successfully completed, you can view information on the batch and download the batch file with the associated certs (and private keys, if applicable).
Please note, once a batch has been downloaded, it is considered “issued”. For security and operational reasons, we cannot credit the certs back to your account if an error is found in the certificates. If you recognize there is an error prior to downloading, you can reject the batch and your certs will be credited back to your account.
- From the Batches tab, find the batch which you would like to view and download. It should indicate Ready for Download.

- Hover over the line and 3 icons will appear under the Batch Name column. Select the “i” icon to view the details of the batch
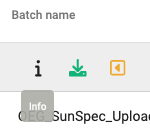
- The batch details will indicate details of the batch process including any errors that occurred during the batch.
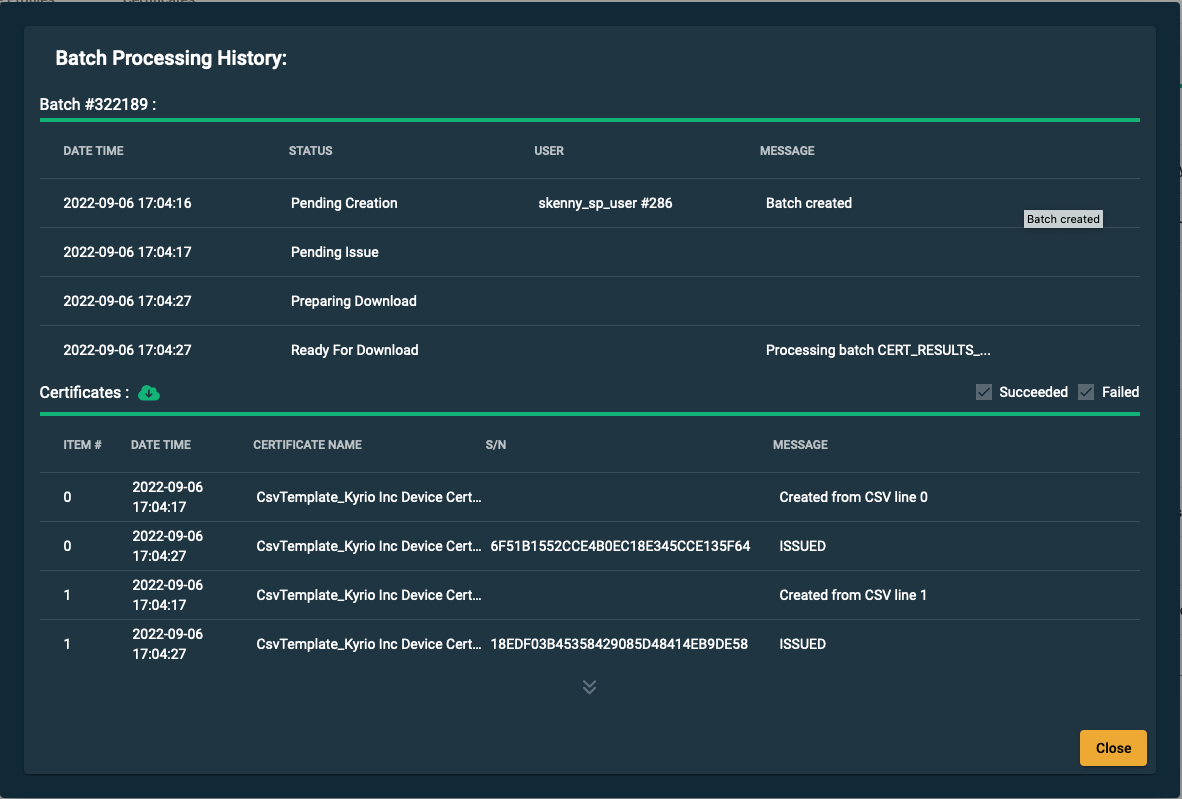
- If satisfied with the results, click Close and hover over the line again and select the green download icon
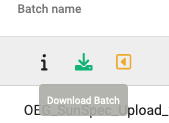
- The file will be downloaded to your computer and you can continue with your deployment process.
Downloading root and intermediate certificates
You may need to download the root and intermediate (i.e. sub CA or issuing CA) certificates to chain with your end entity certificates.
- Click on the Certificate Profiles tab.
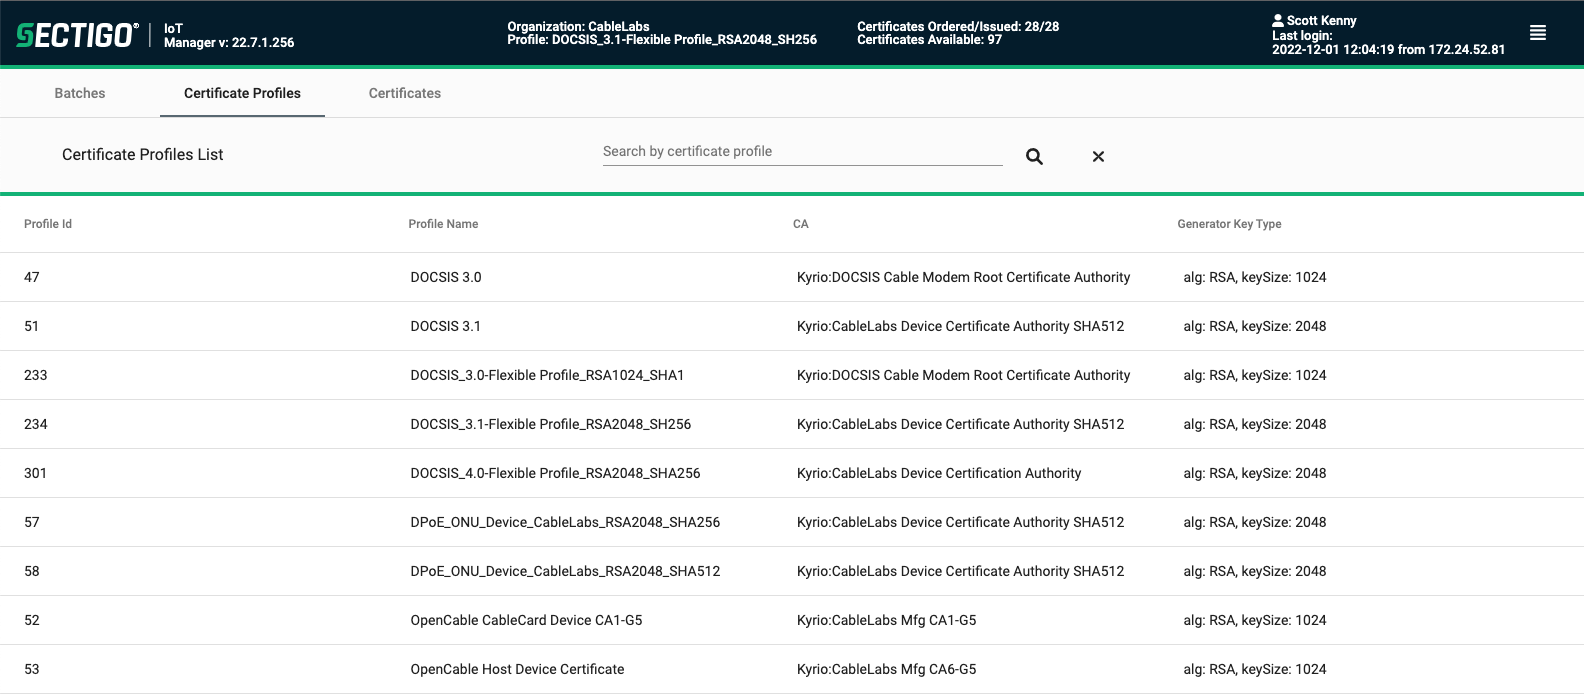
- Hover over the profile of the certificate you want to download and click on the line. A new window will display.
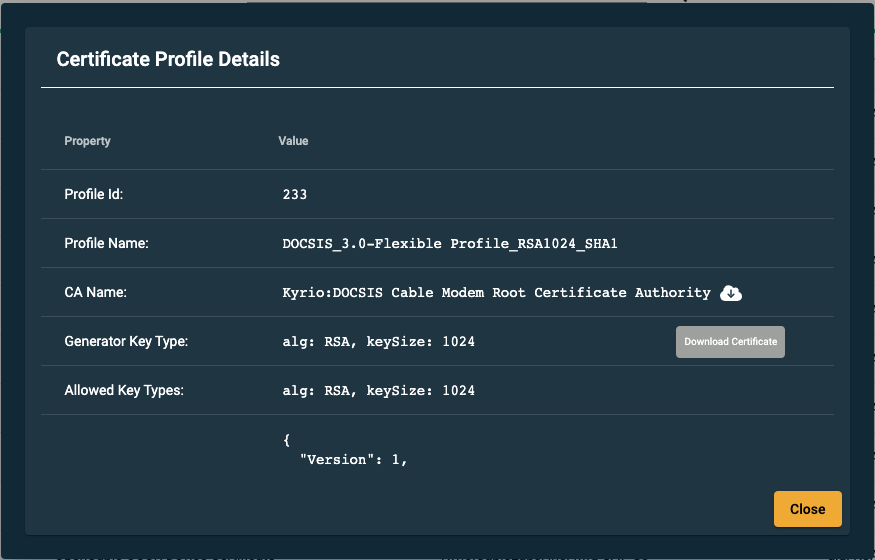
- Click on the download cloud icon. The root and intermediate certs will be downloaded by your browser as a ZIP file. File download location will vary by browser and/or user settings.
Revoking certificates
If you need to revoke the certificates, you have two options: revoke a whole batch or revoke an individual certificate.
Revoke a batch
- From the Batches tab, find the batch you would like to revoke.
- Hover your mouse over the line of the batch you would like to revoke.
- On the right side of the line, three icons will appear. Select the right-most icon that is a yellow “X” with the “Revoke” label.
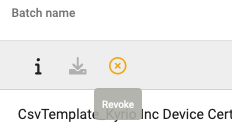
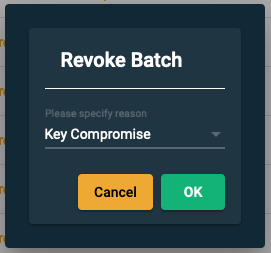
- Confirm the reason to revoke the certificates and click “OK”
- The Status of the batch will change to Revoked
 Revoke an individual certificate
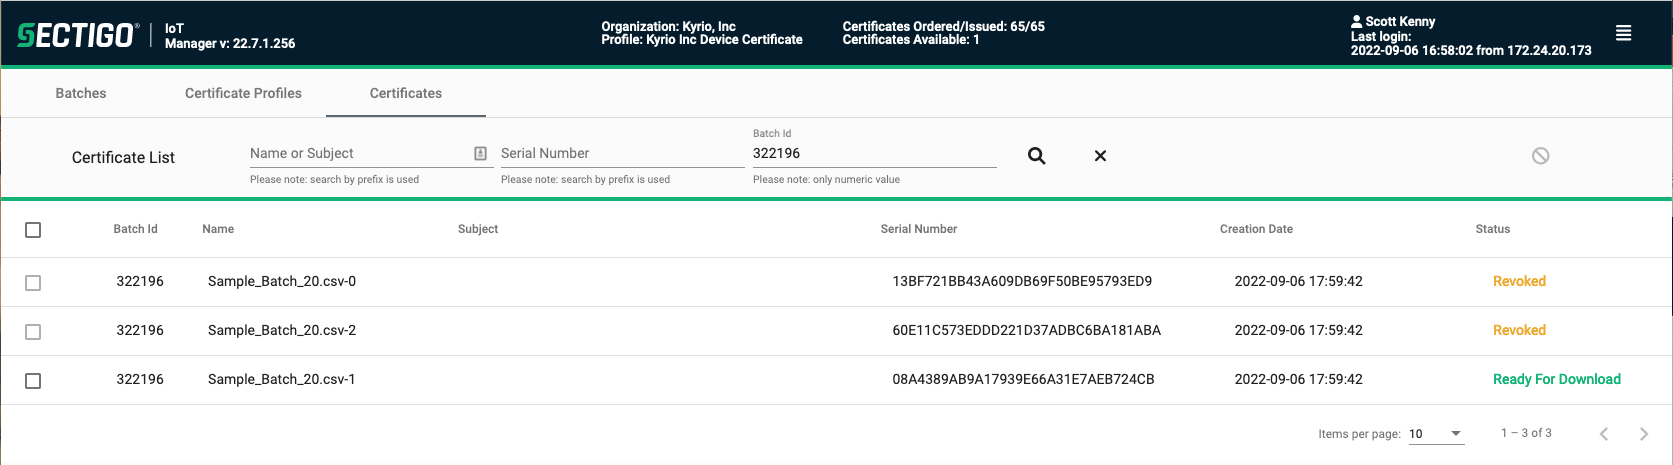
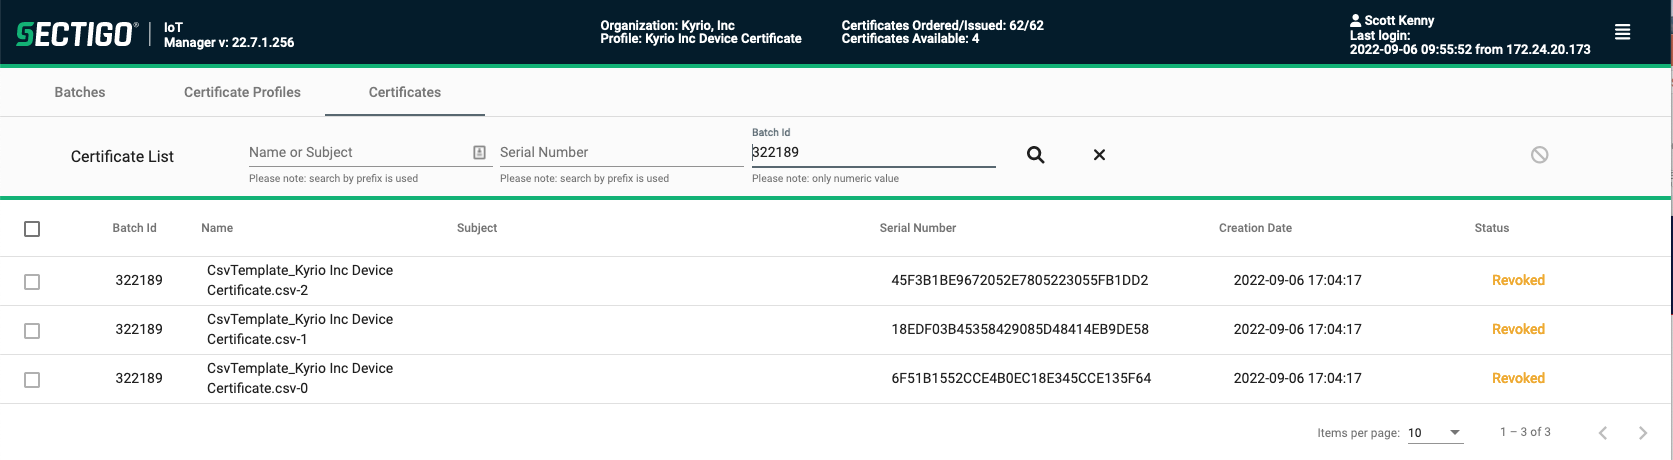
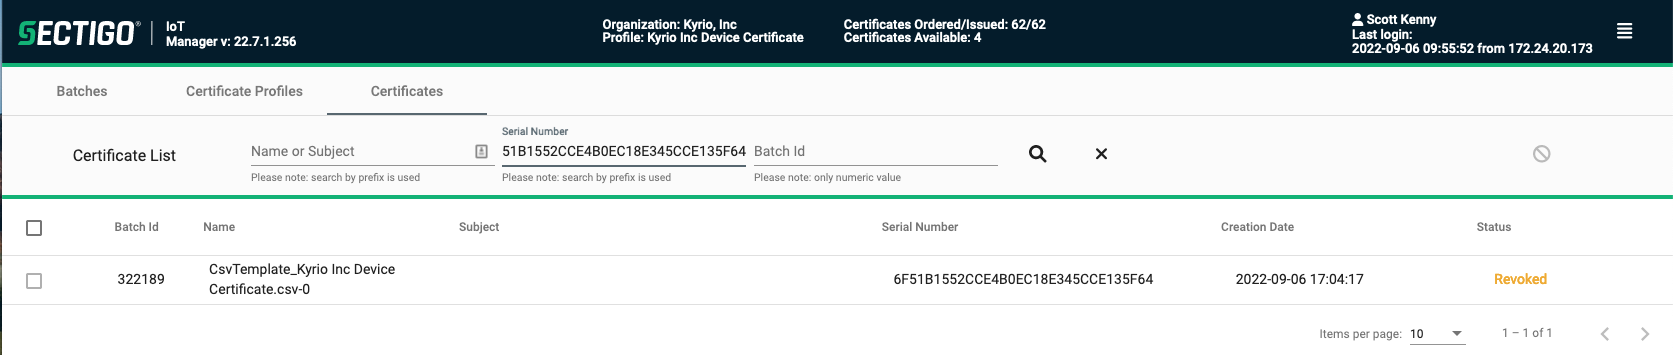
- From the Certificates tab, search on the certificate(s) you want to revoke with the search options at the top (e.g. serial number, Batch ID)
![]()
By Batch
 By Serial
- Select the certificates you want to revoke by checking the box at the beginning of the line.
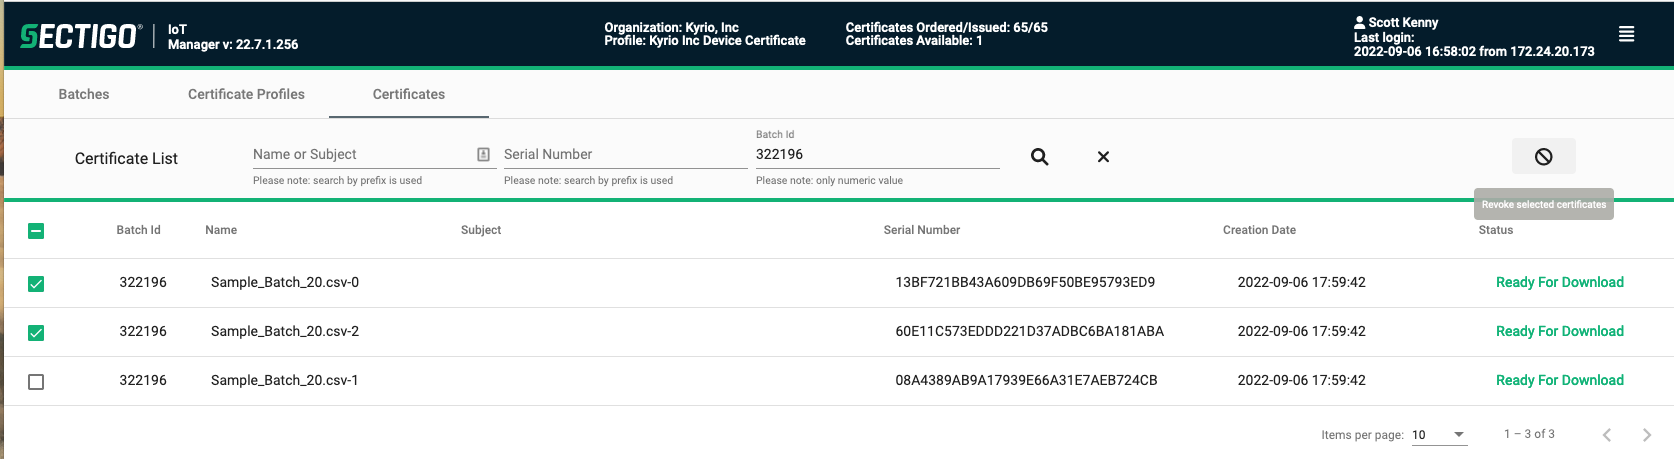
- Click the “Revoke” icon on the right side of the screen.
- Confirm the reason to revoke the certificates and click “OK”.
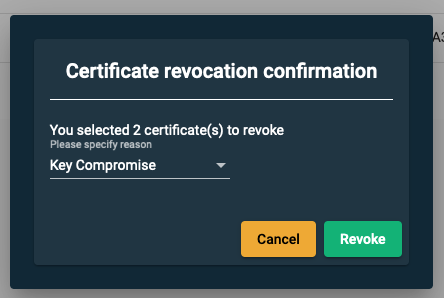
- The Status of the batch will change to Revoked.
Additional Resources:
Do you have any questions?
If you have any questions about the process, the PKI Ops team is ready to help whether it is a technical, financial or operational inquiry.
Please contact: [email protected]